
How to Replace a Face in a Photo Without Photoshop Skills
Learn how to replace a face in a photo with Photoshop, free tools, mobile apps and AI. Get blending tips, ethical checks and export ideas.
Veo3 AI · 14 min read · Sep 18, 2026
You're probably trying to fix one photo that matters. It might be a family picture where one person blinked, a team shot where the wrong face is on the right body, or a social post that needs a cleaner look before you publish. The good news is that how to replace a face in a photo has gone from a tedious retouching job to something you can do with desktop tools, mobile apps, or AI workflows, depending on how believable you need the result to be.
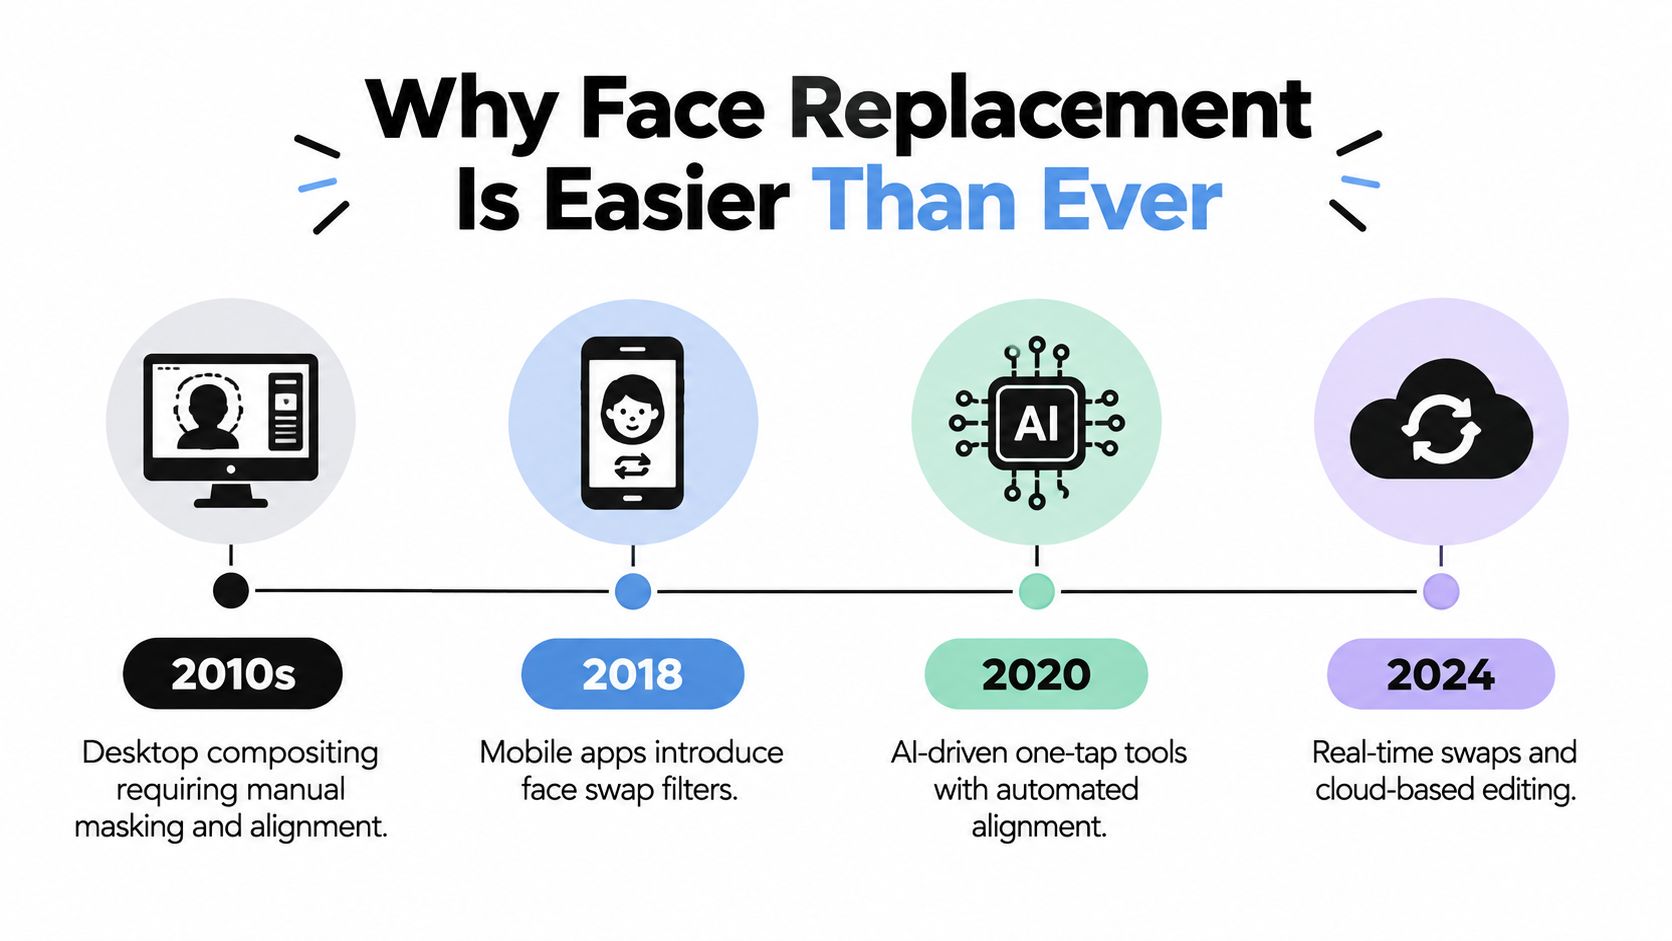
That evolution matters because the right method changes the outcome. A quick swap can be fine for a meme or a private joke, while a polished edit needs cleaner alignment, better blending, and more careful quality control. The earliest documented swaps were already circulating in internet culture in 2004, long before consumer tools made the process easy, and the jump from manual compositing to one-tap mobile apps came much later with Face Swap Live in 2015, which made live replacement in the camera view immediate and accessible timeline reference.
The practical difference today is simple. Some workflows optimize for speed, others for control, and a few try to balance both. The best results usually come from matching the tool to the photo, not forcing every image through the same button-driven app. If you know what makes a swap look fake, you can avoid the usual traps, save time, and decide when AI is enough and when manual retouching is still the safer move.
Why Face Replacement Is Easier Than Ever
A decade ago, replacing a face usually meant sitting in desktop software, tracing edges by hand, and nudging layers until the jawline stopped looking wrong. The technique wasn't new, but the workflow was slow enough that it remained untouched. The history shows a clear shift from niche editing into mainstream creation, with early internet examples, community experimentation on Flickr and 4chan, and then a big consumer jump when Face Swap Live brought immediate replacement into an iPhone camera view timeline reference.
Two jobs, two very different expectations
Any digital editor wants one of two outcomes. The first is a fast, fun swap for a meme, a joke, or a team photo. The second is a believable edit that holds up when someone zooms in, notices skin tone shifts, or compares the lighting on the new face against the original image.
Practical rule: if the photo is meant to be viewed casually, speed matters more than microscopic realism. If it's going into a portfolio, ad, or public brand post, realism has to win.
That's why the modern toolset is broader than ever. Mobile apps can get you close in seconds. AI tools can automate landmarks, warping, and a lot of the blend. Manual editing still matters when the source and target photos don't match cleanly or when you need control over the final look.
The bigger picture is also changing. Face replacement is no longer just a novelty effect. It sits inside a much larger synthetic-media ecosystem, which means the same technique can be used for harmless creativity or for manipulated media that spreads widely online scale reference. That's another reason to understand the workflow instead of relying on a single app button.
What this guide actually helps you do
The rest of the process breaks down into four practical choices. You'll learn how to prepare photos so they're easier to match, how to do a controlled manual swap when the image needs finesse, how to use faster mobile or AI tools when speed matters, and how to clean up the result so it looks intentional instead of pasted on. You'll also see where consent, privacy, and retention policies matter, because a technically decent swap can still become a problem after upload.
Preparing Photos for a Believable Swap
The swap usually succeeds or fails before you open an editor. If the source face and target body don't agree on lighting, angle, or resolution, the blend stage has to work too hard, and that's when the edit starts looking off. The cleanest swaps usually begin with two photos that already share similar conditions.
Match the photo, not just the face
Start with lighting direction. If the light is coming from the left in one image and from above in the other, the face will sit in the frame differently and the shadows will betray the edit. Then check pose and head tilt, because a straight-on face dropped into a three-quarter pose rarely fits without warping.
Resolution matters too. A sharp source face placed into a soft, low-quality target almost always exposes edge issues later. If you're choosing between files, work from the highest-quality original and keep a copy untouched so you can always restart without degrading the image further.
The practical list is short, but each item saves time later:
- Lighting direction: choose photos where shadows fall in a similar direction.
- Head angle: keep tilt, yaw, and eye line close if you want a natural match.
- Resolution and crop: avoid mixing a tiny face with a large, detailed target.
- Background simplicity: plain or soft backgrounds make masking easier.
- File format: use a clean high-quality source, and keep transparency-friendly exports when the workflow allows it.
For background cleanup before you even begin, a dedicated image background remover can help isolate the subject and reduce the amount of manual masking you'll need later.
Hair, glasses, and profile angles are the usual troublemakers
Hairline detail is where many swaps break first. Stray hair, bangs, hats, and glasses all create partial occlusions that confuse automatic selections and make manual masking more tedious. Profile angles are even harder, because the face shape changes enough that simple alignment won't solve the problem.
If the subject is turned away from the camera, the swap needs a stronger warp or a completely different source image. A bad angle won't be rescued by a better filter.
Keep your source folder tidy. Use a duplicate for every edit, label versions clearly, and don't overwrite the original. That sounds basic, but it's the fastest way to avoid repainting yourself into a corner after you've already spent time on a near-good result.
How to Replace a Face Manually in Photoshop and Free Alternatives
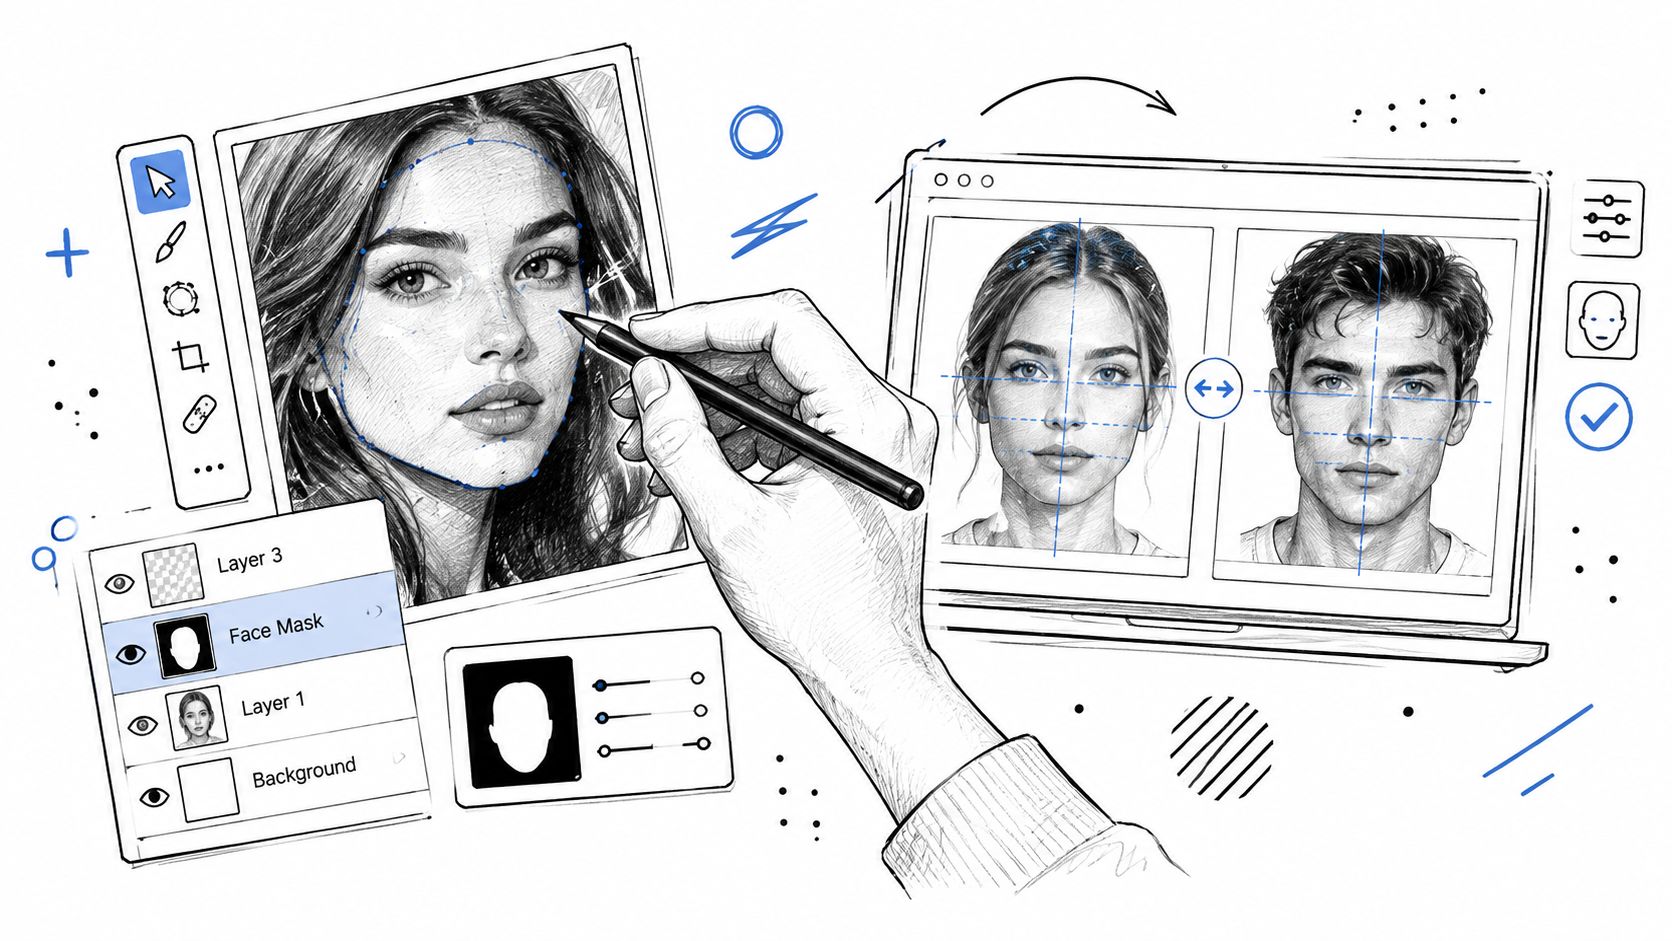
Manual replacement gives you the most control when the photos don't line up cleanly. Photoshop is still the most familiar option for many retouchers, but GIMP can do the same core job if you're working without a subscription. The mechanics are the same either way. Select, mask, warp, blend, then color-match until the inserted face belongs in the picture.
Start with placement, not perfection
Bring the source face into the target file as a new layer and scale it so the eyes, nose, and mouth sit in roughly the right positions. A slightly larger source face often works better than one that's too small, because you can trim excess edges more easily than you can invent missing skin or hair later.
From there, create a precise mask around the face region. In Photoshop, that usually means a layer mask with careful brushing. In GIMP, the same principle applies with mask-based selection and cleanup. The main goal is to separate the new face cleanly from the old one without cutting too hard into the cheeks, chin, or hairline.
Once the face is isolated, adjust the geometry. The workflow described in teaching materials usually starts with landmarks, normalization to a fixed resolution such as 1024×1024, warping the face to the target shape, and then blending with multiband or Poisson-style methods to hide seams workflow reference. That sequence is the backbone of believable swapping.
Blend the seam like you expect someone to zoom in
Most bad edits fall apart. You're not just covering a boundary, you're matching color, softness, and shadow behavior across two different photographs. If the face looks pasted on, the problem is usually in the blend, not the selection.
Opacity, feathering, and gentle color correction do most of the heavy lifting. Use the warp tools sparingly. Too much deformation stretches the skin and makes the eyes or mouth look unnatural. In Photoshop, this often means working with transform and warp controls plus a soft brush on the mask. In GIMP, the same logic applies with transform tools, mask refinement, and manual edge work.
Retoucher's rule: if the jawline is right but the color is wrong, fix color first. If the color is right but the edge still rings, soften the mask and rebuild the seam.
A useful way to sanity-check your edit is to zoom out, then zoom back in. If the swap only works at full size, it isn't done. Strong edits still look plausible when reduced, because the face fits the lighting and structure of the original image instead of relying on tiny texture details to hide mistakes.
For a practical overview of RAW-oriented editing habits on Apple systems, the RAW photo workflow on macOS resource is a useful companion if your source files start as camera originals.
Use the video when the tool choices matter
<iframe width="100%" style="aspect-ratio: 16 / 9;" src="https://www.youtube.com/embed/Pg4I9VwsUjA" frameborder="0" allow="autoplay; encrypted-media" allowfullscreen></iframe>
The fastest way to improve a manual swap is to stop chasing a perfect one-click result. Build the face into the portrait first, then clean the edges, then fix the color. That order keeps you from overediting early and makes each correction easier to judge.
Fast Face Swaps With Mobile Apps and AI Tools
When speed matters, mobile apps and browser-based tools are hard to beat. They detect facial landmarks, handle most of the warping, and try to blend the result automatically, which makes them useful for social content, quick internal mockups, and playful edits. The trade-off is control. The more the software automates, the less room you have to fix a stubborn edge or correct a weird pose.
A group celebration card does not need the same finish level as a product ad. If the image will be seen once in a feed and forgotten, a mobile app is often enough. If the result has to survive closer inspection, AI can still help, but test it on a few different crops before you approve it.
| Workflow | Best For | Control Level | Typical Time |
|---|---|---|---|
| Manual desktop editing | Controlled retouching, awkward angles, important images | High | Longer |
| Mobile face-swap apps | Quick social posts, jokes, casual edits | Low to medium | Very short |
| Browser-based AI tools | Fast production drafts, marketing concepts, reusable templates | Medium | Short |
AI tends to outperform manual editing when the photo is clean, frontal, and well lit. It is less reliable when glasses, hair, heavy shadows, or profile views complicate the face shape. In those cases, automation gives you a starting point, not a finished asset.
The fastest tools usually get two things right first, landmark detection and rough blending. That saves time on basic placement, which matters when you are producing drafts or testing concepts. They are weaker on skin tone drift, jawline mismatches, and edge halos around complex hair, and those are the details that make a swap feel off in the first place.
That is why social posts and light creative work are the sweet spot. A meme, event recap, or team concept image can often live with a slightly imperfect swap. A client-facing visual usually cannot, because the flaws show up fast once someone zooms in or looks at the portrait next to neighboring images.
Veo3 AI fits this category as one option for image-based edits and later animation. Its editor supports brush-based transformation on uploaded image formats and can preserve a face reference in chained editing workflows. Use it when you want to move from a static source image toward a more guided generated result without rebuilding everything manually.
The other part of the job is restraint. If the source face already fits the pose and lighting, keep the edit simple and stop as soon as the swap reads cleanly. If the result is going to be shared publicly, consent, privacy, and policy still matter more than a fast turnaround. A quick edit is only useful if you can publish it with confidence.
Blending Retouching and Ethical Safeguards That Most Guides Skip
The last five percent of a swap is what people notice first. A face can be technically placed correctly and still look wrong because the color is off, the edges are too crisp, or the pose doesn't match the body beneath it. In benchmark work, identity swap systems are typically judged with metrics such as ID retention, expression error, pose error, and FID, because realism isn't one problem, it's several at once evaluation reference.
Fix the visible problems before you call it done
Color mismatch usually shows up as skin that feels too warm, too cool, or too flat compared with the neck and shoulders. Edge halos happen when the mask is too hard or the source lighting doesn't agree with the target. Minor pose differences can sometimes be handled with warp tools, but large differences usually need a different source photo.
The broader benchmark literature also makes one thing clear, models trained on narrow manipulation types often struggle when the forgery set gets more diverse benchmark reference. In practice, that means you should trust your eyes more than a one-click score. If the face feels disconnected from the body, the edit still needs work.
Don't judge the swap only at full zoom. Step back, look at the whole portrait, then zoom in on the jawline, eyes, and hairline. The weak point usually jumps out fast.
Treat consent and upload handling as part of the workflow
The safety gap in face-swap tools is easy to ignore until it isn't. Recent safety research found that many apps with face-swap functionality lacked technical safeguards against nudification and that a large share of tested apps were classified as unsafe across image pairs safety reference. That's a serious reminder that a face swap is not just an aesthetic edit, it's also a biometric and consent issue.
Before uploading anything, check whether the tool stores images, how long it keeps them, and whether it allows deletion. If the image contains someone else's face, make sure you've got permission to use it. For marketing teams, educators, and creators, this is not optional housekeeping, it's the difference between a clean workflow and a risky one.
If you want a practical editing path with face-aware retouching features, portrait retouch can be a useful reference point for tool selection when you're comparing cleanup options.
Exporting Your Result and Turning Photos Into Video
The export decision should match the final use. For web or social, keep the file crisp without overcompressing the skin texture. For print, preserve the highest-quality version you can. For internal drafts, keep layered files or editable versions so you can revisit the mask if the client changes direction.
Once the still image is approved, the next question is whether it should stay static. A swapped face can work as a promo still, but it can also become a short clip for reels, ads, or training content. Veo3 AI's apps to animate photos guide is relevant here if you want to move a finished image into motion without rebuilding the concept from scratch.
The cleanest workflow is usually simple. Choose the right editing path, check the blend, confirm consent, export at the right quality, then decide whether the image earns a second life as video. If you want to keep the image believable, don't overprocess the final export, and don't animate a face that still looks broken in still form.
If you want a faster way to turn a clean face swap into a finished visual, Veo3 AI gives you image editing and video generation in one place. It's built for creators who want to move from a static edit to an animated result without juggling separate tools, so it's a sensible next stop for testing face swaps, retouching portraits, and turning approved images into short videos. Visit Veo3 AI to try it on your next edit.
Related Articles
Continue with more blog posts in the same locale.
How to Make Anime Movies from Idea to Release
Learn how to make anime movies from concept to distribution with AI workflows, Veo3 prompts, and pro pipeline tips for indie creators.
Read article
Best Time to Upload Video on YouTube: A Data-Driven Guide
Discover the best time to upload video on YouTube. Learn how to read analytics, run timing experiments, and schedule uploads for maximum reach.
Read article
How to Change the Lighting in Photos and Video Fast
Learn how to change the lighting in photos and video with Veo3 AI prompts, color controls, and relighting tips for natural, cinematic results.
Read article